Showing posts with label ice cream. Show all posts

Monday, June 30, 2014

Falling in Love with Les Halles de Paris

I consider eating two ice cream cones before noon a VERY good foodie day! Back in May in Paris¸ I did exactly that!
Salted butter caramel glace from À la Mère de Famille and pistachio from Stohrer.
Instead of visiting museums, I wanted to explore the foodie neighborhood of Les Halles, in the 1st arrondissement, which the French King established as the traditional central market of Paris in the 12th century. My only agenda was to browse, eat, take photos and perhaps buy some French goodies to take back to Poland. Many of my foodie destinations were based on David Lebovitz’s recommendations in his book “The Sweet Life in Paris” and his blog post: Cookware Shops in Paris.

As I walked from our hotel near the Moulin Rouge, I stumbled upon the chocolatier/confiserie, À la Mère de Famille, founded in 1761. This old-fashioned candy store offers a wide variety of chocolates, bon bons, candied fruits, and yes, ice cream. I bought a small box of mixed chocolates as well as the best salted butter caramel ice cream cone I’ve ever had and sampled a few chocolates courtesy of my nice French sales assistant.
Don't you just love this vintage storefront at À la Mère de Famille?
Mmm...chocolates!
From there, I continued down Rue Montmartre to Librairie Gourmande, which unfortunately was closed because of some silly French bank holiday. I’m sure my husband was happy because I already own 250+ cookbooks and he doesn’t think I need any more. But if you love cookbooks as much as I do, I'd definitely recommend stopping here.
Next, I continued on to some of the kitchen supply stores located in and around the Les Halles neighborhood. I stopped at Mora, A.Simon, and E. Dehillerin, but surprisingly I didn’t buy a thing! I didn’t find anything that I just couldn’t live without.
E. Dehillerin has a fantastic selection of copper pastry molds and pans!
Then, I stopped by G. Detou, a gourmet shop selling all kinds of olive oils, nuts, mustards, baking supplies and chocolates galore! Again, I just couldn’t justify spending nearly 9eu for 250 grams of chocolate, but it was fun to browse!

My stomach was starting to grumble again so I headed to the heart of Les Halles on rue Montorgueil, where some of the oldest stores in Paris are located. At 51 rue Montorgueil is the Bakery Stohrer, the oldest patisserie in Paris. Stohrer was the pastry chef for Marie Leszczynska, the wife of King Louis XV (1710-1774). Inside this small shop, you’ll find dozens of decadent-looking pastries, freshly baked breads and croissants and more. I bought two baguette sandwiches, a pain au chocolat, a cherry clafoutis and my second ice cream cone. Delicious!
I continued to wander through Les Halles, but quickly realized how difficult it is to eat an ice cream cone and take photos at the same time! I loved the vibrancy of this old neighborhood, which seemed full of happy people shopping, eating or sitting at one of the numerous cafés.
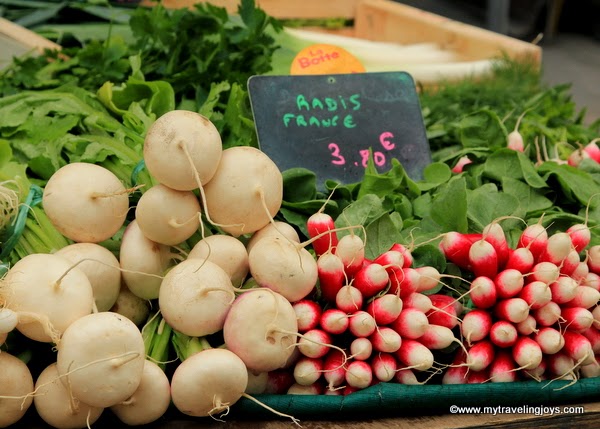
I stumbled upon a farmer’s market set up in the street near the Church of Saint-Eustache, a beautiful Gothic-Renaissance style church constructed in the 16th century.
After visiting several of the food stores in Les Halles and smelling the aroma of roasting chickens, I was now ready for lunch! I headed back to our hotel so I could share my baguette sandwiches from Stohrer with my hard-working hubby.

Bon appétit!
This photo simply doesn't do these baguette sandwiches justice! They were simply delicious!
Perfectly arranged French strawberries at a market in Les Halles, Paris.
I loved this old mural on one of the buildings along rue Montogueil.
Cute French girl by this boulangerie in Les Halles.
Location of mentioned stores in/near Les Halles de Paris:
  • À la Mère de Famille, 35, rue du Faubourg-Montmartre.
  • A.Simon, 48 rue Montmartre.
  • E. Dehillerin, 18 rue Coquillere.
  • G. Detou, 58 rue Tiquetonne.
  • Mora, 13 rue Montmartre.
  • La Fermette Fromagerie, 86 rue Montogueil.
  • Librarie Gourmande, 90 rue Montmartre – For cookbooks!
  • Stohrer, 51 rue Montogueil.

Wednesday, September 4, 2013

Before berry season ends, I should share this super delicious summer ice cream recipe with you!

I’ve finally figured how to work my 220v machine so I don’t blow a fuse. That way I can fulfill my marriage vows of making homemade ice cream for my husband at least once a year. He’s one lucky guy, let me tell you!

From one of my favorite foodie blogs, October Farm, I stumbled upon this recipe for blackberry & chocolate chip ice cream on another blog called Gourmandistan, written by a food-loving couple in Kentucky. This recipe caught my eye because the market stalls at Hala Mirowska have been flooded with berries.
This is how I buy my berries and eggs at Hala Mirowska in Warsaw.
I can make only so many berry-flavored vodkas as well as freeze and eat so many berries for breakfast, so of course they must be used in desserts.

I actually love making ice cream and probably could make it in my sleep. I used to make several ice cream batches a day when I worked in restaurants full-time. Now, I only make ice cream as an occasional treat at home.

Homemade ice cream is really worth the effort, especially when there's chocolate involved! I promise! 

Smacznego!
Blackberry & Chocolate Chip Ice Cream
(Adapted from Gourmandistan’s recipe)
Yields: about 1 quart

425      g.         (3 cups)           fresh blackberries, rinsed
Juice from ½                           a lemon
55        g.         (1/4 c.)             granulated sugar

180      ml.       (6 oz.)              milk
110      g.         (1/2 c.)             granulated sugar
Pinch                                       salt
3          ea.                                egg yolks from large eggs

180      ml.       (6 oz.)              heavy cream (I used 36% Polish cream.)
½         tsp.                              vanilla extract

100      g.         (3.5 oz.)           dark chocolate, chopped small
1.         In a small pot, combine the blackberries with the lemon juice and first amount of sugar. Cook over low heat for about 10 minutes until the berries are softened. Then, purée this mixture with a hand stick blender or in a food processor. Strain through a fine-meshed strainer to remove the seeds. Set aside to cool.
2.         In a medium-sized pot, heat the milk, sugar and salt together until the sugar is dissolved.
3.         In a small bowl, whisk together the egg yolks. Then slowly pour some of the warm milk mixture into the yolks, whisking constantly, then scrape the warmed yolks back into the pot. This is the tempering stage of making a custard...i.e. ice cream in this case.

4.         Cook the custard, stirring constantly with a rubber spatula, until the mixture thickens and coats the spatula, which takes just a few minutes. This stage is known as nappe in French cooking. If using an instant read thermometer, it should read around 170ºF (77ºC). I always do this stage by eyeballing it. If I can run my finger through the custard on the back of the spoon and the lines don’t run together, then the custard is done. Strain.

5.         Let the mixture cool slightly over an ice bath. When cool, add the blackberry puree, heavy cream and vanilla extract. I used my hand stick blender again.
6.         Refrigerate the mixture thoroughly, preferably overnight, then freeze it in your ice cream maker according to the manufacturer’s instructions.
7.         When your ice cream base is almost done spinning (about 20 minutes later), add the chopped chocolate.
8.         Transfer your homemade ice cream to a plastic container and allow to harden for several hours or overnight in the freezer. (I always sample a spoonful or two before I freeze it!)

Note: We like dark chocolate, but we found the 90% chocolate bar to be too bitter. Next time, I’d stick with using 60 or 70% dark chocolate.

Saturday, April 9, 2011

I poured my homemade strawberry-mint base into my new ice cream maker. I hit start and nothing happened.

I immediately turned it off, thinking that I blew a fuse or something. This wouldn’t be the first time for me. Adjusting to the different electrical voltage/appliances in a foreign country has been what you could call….challenging.

My husband told me I just had to attach one adapter to the plug and it should work. Well, it didn’t.

Then, I thought I had killed my brand new machine that I recently had brought back from London because I couldn’t find one anywhere in Istanbul.

So two phone calls later to my husband and searching for adapters, I figured how to jerry-rig the ice cream machine.  He had asked me on the phone, “Did you read the instruction booklet?”

“Why would I do that? I know how to operate an ice cream machine. And you’re supposed to know this electrical stuff,” I told him.

Well, I plugged the machine into a UK/Turkish adapter, which I plugged into a Turkish/U.S. adapter that I plugged into our 110 to 240v electrical transformer brought from the states.

Then, I had a new obstacle to overcome. During these 10 minutes, my ice cream base had started freezing to the sides of the bowl in the machine. The paddle was stuck and wouldn’t spin.

Now, I had to scrape out most of the ice cream and carefully melt it in the microwave. I poured the reheated base back into the machine, turned it on and it finally started spinning.

This is what a woman will do to make homemade ice cream!

In our marriage vows, I promised to make my hubby homemade ice cream at least once a year since it’s his favorite dessert in the whole world. However, at the time I didn’t realize I’d be dealing with these issues. Just kidding, honey!

Anyway, the bright red çilek from the pazar were simply delicious. When I asked the satıcı if I could take a photo, he proudly showed me a photo of the pile of çilek he had take with his own camera. These çilek were from the Antalya region of Turkey.
After my machine had been chugging away noisily for about 30 minutes, I’m happy to report that my ice cream turned out beautifully. The consistency is bit more like soft serve when it first comes out of the machine but will harden after 2 hours or so once placed back in the freezer.

Since I had some leftover mint leaves from making the pea soup, I added it in with my cream and milk while I was making the ice cream base.

Homemade ice cream really is worth the effort. I just hope you don’t have all the trials and tribulations that I dealt with in my kitchen! Hopefully, my next batch will be easier.

Afiyet olsun!
Strawberry-Mint Ice Cream
(yields: about 1.5 quarts)

465 g. (1 lb.) fresh strawberries, cleaned and sliced
130 g. (2/3 c.) granulated sugar
1 T. fresh squeezed lemon juice

10 oz. (300 ml.) heavy cream or krema
10 oz. (300 ml.) whole milk
5 sprigs   fresh mint leaves
½ cup (100 g.)   granulated sugar
9 ea.   whole egg yolks

Optional: 1 T. vodka

1. Place strawberries, sugar and lemon juice in a bowl together and mix well. Cover the bowl with plastic wrap and let macerate at room temperature for 1 hour.

2. Then, place the strawberries in blender or food processor and puree until smooth. Set aside.
3. In a medium-sized pot, bring the milk and cream to a boil. Add the mint leaves. 
4. Remove the pot off the heat and cover with a lid. Let steep for at least 15 minutes.
5. In a separate bowl, whisk together the second amount of sugar with the egg yolks. Then slowly pour some of the warm cream mixture into the yolks, whisking constantly, then scrape the warmed yolks back into the saucepan. This is the tempering stage of making a custard...i.e. ice cream in this case.
6. Cook the custard, stirring constantly with a heatproof rubber spatula, until the mixture thickens and coats the spatula. This stage is known as nappe in French cooking.  If using an instant read thermometer, it should read around 170ºF (77ºC). I always do this stage by eyeballing it. If I can run my finger through the custard on the back of the spoon and the lines don’t run together, then the custard is done.
7. At this point, add the strawberry puree into the hot mixture. I used my hand immersion blender for a few minutes to puree the mint and the strawberries a little more thoroughly.
8. Then, strain the mixture through a fine-mesh strainer. Place the mixture over an ice bath until cool.
9. Refrigerate the mixture thoroughly, preferably overnight, then freeze it in your ice cream maker according to the manufacturer’s instructions.
10. When your ice cream base is almost done spinning, add the vodka while the machine is churning. 

Note: by adding alcohol, you can prevent the ice cream from freezing rock solid later in your home freezer.
This is what your ice cream should look like when it's almost done.